DIY Outdoor Kitchen Ideas You Can Build Over a Weekend
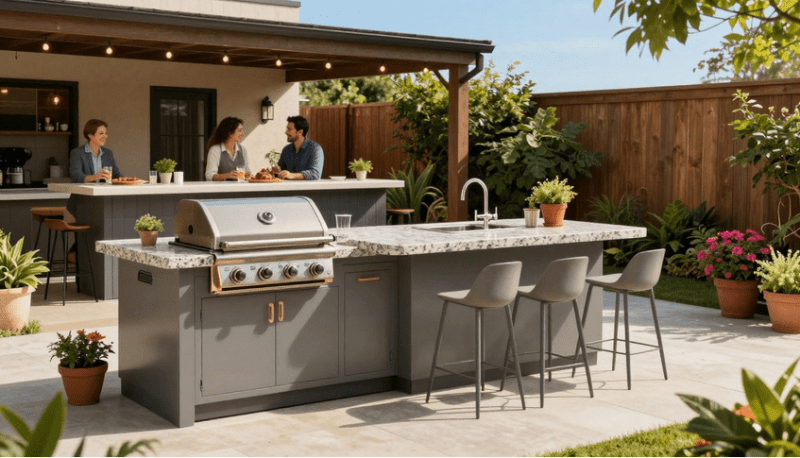
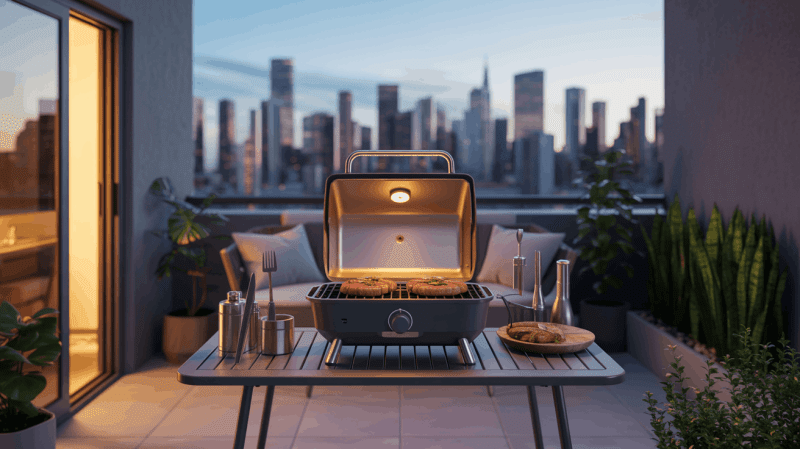
Imagine stepping into your backyard on a warm summer evening, firing up your custom-built outdoor kitchen, and serving delicious grilled meals to friends and family. The good news? You don't need weeks of construction or a contractor's budget to make this dream a reality. With the right plan and materials, you can create a functional DIY outdoor kitchen in just one weekend that adds value to your home and transforms how you enjoy outdoor living.
Whether you're a seasoned DIYer or just getting started with home projects, these weekend-friendly outdoor kitchen ideas will help you cook outside in style without breaking the bank. Each project is designed to be completed in 1-2 days, using readily available materials and basic tools. Let's get building!
Why Build a DIY Outdoor Kitchen?

Before diving into our weekend projects, let's look at why a DIY outdoor kitchen is worth your time and effort:
Enhanced Outdoor Living
An outdoor kitchen creates a natural gathering space that extends your living area beyond the walls of your home. It transforms a basic patio or deck into a functional cooking and entertaining zone that you'll use throughout the warmer months.
Increased Home Value
Outdoor kitchens consistently rank among the top outdoor features that boost property values. Even a modest DIY version can make your home more attractive to potential buyers while providing years of enjoyment for your family.
Better Entertaining Experience
No more running back and forth between your indoor kitchen and outdoor grill. With a proper outdoor kitchen, you can prepare meals while engaging with guests, keeping the party flowing smoothly.
Cost-Effective Solution
Building your own outdoor kitchen can save 40-60% compared to professional installation. A weekend DIY project using smart material choices delivers the functionality you need without the premium price tag.
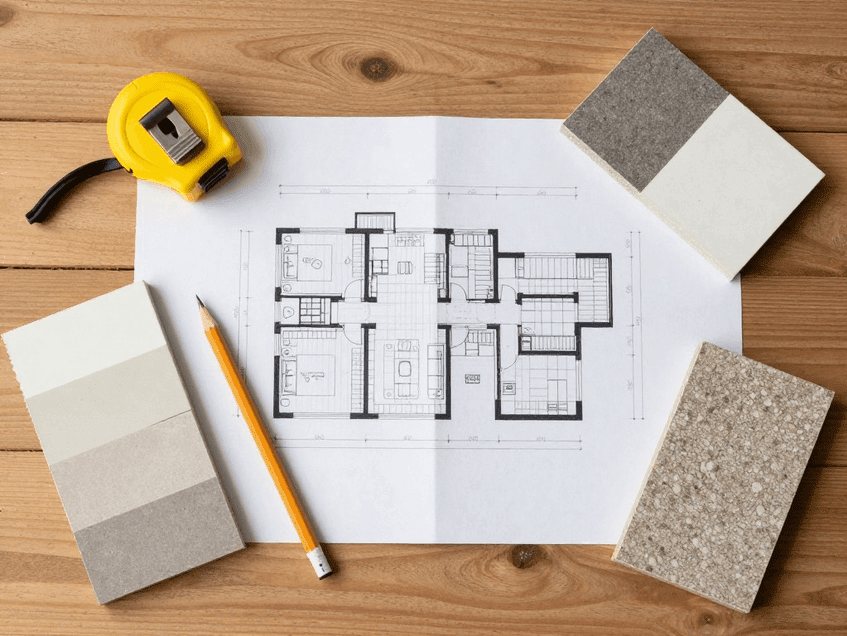
Essential Planning for Your Weekend Project

Before grabbing your tools, take time to plan your outdoor kitchen project properly. This preparation ensures your weekend work goes smoothly and results in a functional cooking space you'll enjoy for years.
Choose the Perfect Location
Select a spot that's convenient to your home but at least 10 feet away from any structures for safety. Consider proximity to utilities, protection from wind, and whether you need shade during peak cooking hours. A level surface is ideal—existing patios or decks make excellent foundations.
Consider Utility Access
Think about what utilities your outdoor kitchen will need. For simple weekend projects, propane tanks eliminate the need for gas lines. If you want running water or electrical outlets, plan your kitchen near existing utility access points to minimize additional work.
Safety First: Always check local building codes and HOA regulations before starting your project. Some areas have specific requirements for outdoor cooking spaces, especially regarding gas lines and electrical work.
Weather-Ready Materials
Choose materials that can withstand your local climate. Pressure-treated lumber, concrete blocks, stone, and stainless steel all hold up well to outdoor conditions. For countertops, consider concrete, granite, or outdoor-rated tile that can handle temperature fluctuations.
Right-Size Your Project
Be realistic about what you can accomplish in a weekend. Focus on creating a functional cooking area with some counter space rather than attempting an elaborate outdoor kitchen that might remain unfinished. You can always expand your kitchen in future weekend projects.
Ready to Start Planning?
Grab our free DIY Outdoor Kitchen Planning Checklist to ensure you've covered all the essentials before your weekend build.
Download Planning Checklist1. The Rolling Grill Cart Kitchen

This mobile outdoor kitchen solution combines convenience with functionality. Built around a grill cart design, it provides cooking space, storage, and mobility all in one weekend project. Perfect for smaller patios or renters who may need to move their outdoor kitchen.
Materials Needed
- Pressure-treated 2×4 lumber (approximately 20-30 feet)
- 3/4" exterior-grade plywood (2 sheets)
- Heavy-duty locking casters (4)
- Stainless steel hinges and handles
- Exterior wood screws
- Outdoor wood sealer or paint
- Stainless steel or outdoor-rated countertop material
- Your existing grill (or new tabletop grill)
Tools Required
- Circular saw or miter saw
- Drill/driver with bits
- Measuring tape and level
- Sander
- Clamps
- Safety gear (gloves, eye protection)
Weekend Build Steps
- Build the frame: Construct a sturdy rectangular frame from 2×4s, sized to accommodate your grill on top with storage underneath. Typical dimensions are 48" wide × 24" deep × 36" high.
- Add the base and shelving: Attach plywood to create a solid base and internal shelving for storage. Leave space for propane tank access if needed.
- Install casters: Attach heavy-duty locking casters to the bottom of the frame for mobility. Make sure they can support the weight of your completed kitchen.
- Add doors and storage: Create simple cabinet doors from plywood and attach with hinges. Add handles for easy access to stored grilling tools and supplies.
- Install countertop: Cut and secure your countertop material, leaving an appropriate opening for your grill if it will be built in.
- Finish and seal: Sand all surfaces smooth, then apply exterior-grade sealer or paint to protect the wood from weather and spills.
Pros
- Mobility allows for flexible placement and winter storage
- Perfect for renters or those with limited space
- Can be built in a single day with basic tools
Cons
- Limited counter space compared to fixed options
- Not as durable in extreme weather conditions
- May require seasonal maintenance
Get Rolling This Weekend
All the materials you need for this project are available at your local hardware store. Start building your mobile outdoor kitchen today!
Shop Materials Now2. The Concrete Block Kitchen Island

This durable, weather-resistant outdoor kitchen uses concrete blocks as its foundation, creating a solid cooking station that can withstand the elements. The simple construction method makes it achievable in a weekend while providing a permanent outdoor cooking solution.
Materials Needed
- Standard concrete blocks (approximately 50-60, depending on size)
- Construction adhesive for masonry
- Pre-cut concrete countertop or outdoor-rated tile
- Mortar mix (optional for greater stability)
- Decorative stone veneer or heat-resistant paint (optional)
- Drop-in or slide-in grill unit
- Metal grill surround/jacket (for heat protection)
Tools Required
- Measuring tape and level
- Rubber mallet
- Caulk gun for adhesive
- Masonry saw or angle grinder (if blocks need cutting)
- Trowel (if using mortar)
- Safety gear (gloves, eye protection, dust mask)
Weekend Build Steps
- Prepare the foundation: Ensure you have a level concrete pad or paver base. Mark out the footprint of your kitchen island (typically 6' × 2').
- Lay the first course: Position concrete blocks in your desired layout, using a level to ensure they're even. For a standard L-shaped design, create a longer section for the grill and counter space, with a shorter perpendicular section for additional prep area.
- Build upward: Apply construction adhesive between layers and stack blocks in a staggered pattern for strength. Leave appropriate openings for the grill and any storage areas. Standard counter height is 36".
- Create storage: Position blocks to create openings for propane tank storage, shelving, or cabinet areas as desired.
- Install grill jacket: Place the insulated metal jacket for your grill in the appropriate opening to protect surrounding materials from heat.
- Add the countertop: Once the structure is complete, apply construction adhesive to the top layer of blocks and carefully position your countertop material.
- Finish the exterior: Apply stone veneer, tile, or heat-resistant paint to enhance the appearance of the concrete blocks if desired.
Pros
- Extremely durable and weather-resistant
- Inexpensive materials make this a budget-friendly option
- No special carpentry skills required
Cons
- Heavy and permanent—difficult to modify once built
- Basic design may need decorative finishing for aesthetic appeal
- Requires a level concrete foundation
Build to Last
Ready to create a durable outdoor kitchen that will stand the test of time? Get all your concrete block kitchen materials delivered right to your home.
Order Materials Now3. The Repurposed Pallet Grill Station

This eco-friendly outdoor kitchen repurposes wooden pallets to create a rustic yet functional cooking station. With minimal cost and basic tools, you can transform free or low-cost pallets into a stylish grill station complete with storage and prep space.
Materials Needed
- 6-8 wooden pallets (heat-treated, not chemically treated)
- 2×4 lumber for reinforcement (approximately 16 feet)
- Exterior wood screws
- Sandpaper (medium and fine grit)
- Exterior wood sealer or paint
- Casters (optional for mobility)
- Outdoor-rated countertop material (butcher block, tile, or sealed plywood)
- Heat shield material for grill area
Tools Required
- Pry bar (for disassembling pallets if needed)
- Hammer and nail puller
- Circular saw
- Drill/driver with bits
- Sander
- Measuring tape and level
- Safety gear (gloves, eye protection)
Weekend Build Steps
- Prepare the pallets: Clean and sand the pallets thoroughly to remove splinters and rough edges. Disassemble some pallets if needed for additional wood pieces.
- Create the base structure: Arrange 2-3 pallets side by side and secure them together with 2×4 supports underneath for stability.
- Build the upper structure: Stack and secure additional pallets to create the desired height (typically 36" for counter height). Reinforce with 2×4 lumber as needed.
- Add internal supports: Install cross braces and supports inside the structure to ensure it can hold the weight of your grill and countertop.
- Create storage areas: Use pallet boards to create shelving, hooks for tools, and storage areas within the structure.
- Install heat protection: Add a heat shield (cement board or metal) in the area where the grill will sit to prevent fire hazards.
- Add the countertop: Install your chosen countertop material, leaving an appropriate opening for the grill.
- Sand and finish: Sand all exposed wood surfaces and apply multiple coats of exterior-grade sealer or paint to protect from weather and extend the life of your kitchen.
Pros
- Extremely budget-friendly using recycled materials
- Customizable to your exact space and needs
- Rustic aesthetic adds character to outdoor spaces
Cons
- Requires more maintenance than non-wood options
- May not last as long as kitchens built with new materials
- Requires careful attention to fire safety
Safety Tip: Only use heat-treated (HT) pallets for this project, never chemically treated ones. Look for the "HT" stamp on the pallet. Always install proper heat shielding between your grill and any wooden components.
Upcycle This Weekend
Need the finishing touches for your pallet outdoor kitchen? Get high-quality exterior wood sealer and heat shields delivered.
Shop Finishing Materials4. The Modular Outdoor Kitchen Bar

This versatile outdoor kitchen combines cooking functionality with bar-style seating, creating a complete entertainment space. Built using modular frame sections, it can be customized to fit your space and expanded in future weekend projects.
Materials Needed
- Pressure-treated 2×4 lumber (approximately 40-50 feet)
- Pressure-treated 4×4 posts for corners (8 feet)
- 3/4" exterior-grade plywood (3-4 sheets)
- Cement board for grill surround
- Exterior wood screws and concrete anchors
- Weather-resistant countertop material
- Exterior siding material (wood planks, composite boards, etc.)
- Bar-height stools
- Drop-in grill and accessories
Tools Required
- Circular saw or miter saw
- Drill/driver with bits
- Jigsaw (for countertop cutouts)
- Level and square
- Measuring tape
- Sander
- Safety gear (gloves, eye protection)
Weekend Build Steps
- Design your layout: Plan a U-shaped or L-shaped configuration with one section at bar height (42") for seating and the remainder at standard counter height (36") for cooking.
- Build frame sections: Construct rectangular frames from 2×4s for each section of your kitchen. Typical dimensions are 24" deep × 36" high for the cooking area and 16" deep × 42" high for the bar section.
- Connect the frames: Join the frame sections using corner posts and additional supports to create your desired configuration.
- Add plywood sheathing: Cover the frames with plywood to create solid surfaces for attaching exterior finishing materials.
- Install cement board: In the grill area, replace plywood with cement board to provide heat protection.
- Apply exterior finishing: Attach your chosen siding material to the exterior of the frames for weather protection and visual appeal.
- Install the countertops: Cut and secure countertop materials to both the cooking area and bar section, creating cutouts for the grill and any other built-in appliances.
- Add final touches: Install the grill, add hooks for tools, and position bar stools at the seating area.
Pros
- Combines cooking and entertainment in one structure
- Modular design allows for future expansion
- Creates a focal point for outdoor gatherings
Cons
- More complex build than simpler options
- Requires more materials, increasing cost
- May need two weekends for complete finishing
Create Your Entertainment Hub
Ready to build the perfect outdoor kitchen and bar combination? Get all your materials delivered and start building this weekend.
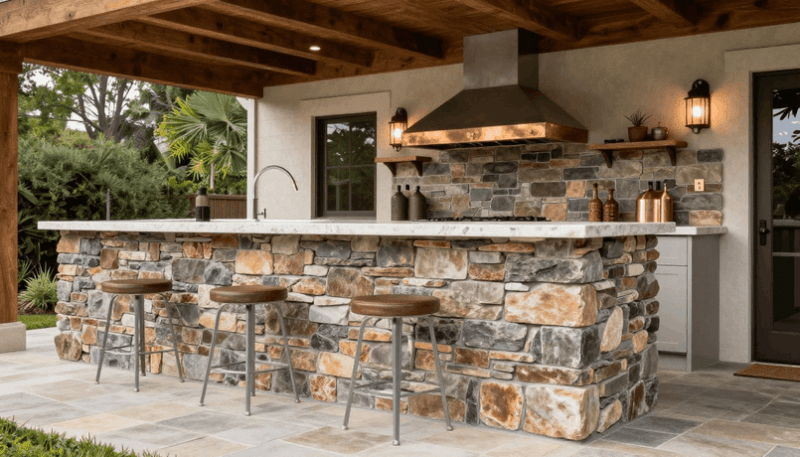
Shop Bar Kitchen Materials5. The Cinder Block & Tile Grill Surround

This attractive and durable outdoor kitchen combines the structural strength of cinder blocks with the visual appeal of decorative tile. The result is a permanent cooking station that's both functional and beautiful, with the tile work adding a custom touch to your outdoor space.
Materials Needed
- Standard cinder blocks (approximately 30-40)
- Mortar mix
- Outdoor-rated ceramic or porcelain tile
- Tile adhesive and grout (outdoor rated)
- Concrete countertop or outdoor-rated stone
- Rebar for reinforcement (optional)
- Metal grill jacket
- Drop-in or slide-in grill
Tools Required
- Masonry trowel
- Rubber mallet
- Level and measuring tape
- Tile cutter or wet saw
- Notched trowel for tile adhesive
- Grout float
- Sponge and bucket
- Safety gear (gloves, eye protection, dust mask)
Weekend Build Steps
- Prepare the foundation: Ensure you have a level concrete pad or paver base. Mark out the footprint of your kitchen (typically 5-6' long × 2' deep).
- Lay the first course: Mix mortar according to package directions and lay the first row of cinder blocks, checking for level as you go.
- Build upward: Continue stacking blocks with mortar between courses, creating openings for the grill and any storage areas. For additional stability, you can fill some block cavities with concrete and rebar.
- Allow mortar to set: Let the block structure cure overnight before proceeding with the tile work.
- Apply tile adhesive: Using a notched trowel, apply outdoor-rated tile adhesive to the exterior faces of the cinder blocks.
- Install tile: Press tiles into the adhesive, using spacers to maintain even gaps. Work in small sections and periodically check for level and alignment.
- Apply grout: Once the tile adhesive has set, mix and apply grout between the tiles. Wipe away excess with a damp sponge before it dries.
- Install the countertop: Apply a layer of mortar to the top course of blocks and carefully position your countertop material.
- Add finishing touches: Install the grill jacket and grill, and add any accessories such as cabinet doors for storage areas.
Pros
- Extremely durable and weather-resistant
- Tile provides endless customization options
- Creates a permanent, high-end looking outdoor kitchen
Cons
- Requires basic masonry and tile-setting skills
- Permanent installation can't be relocated
- May require some touch-up grouting on day two
Add Color and Durability
Ready to create a beautiful tiled outdoor kitchen? Get all your masonry and tile supplies delivered to start your project this weekend.
Shop Tile & Masonry SuppliesFinishing Touches for Your Weekend Kitchen

Once your basic outdoor kitchen structure is complete, these finishing touches will transform it from a simple cooking station into a fully realized outdoor living space that you'll love using all season long.
Lighting Solutions
Add task lighting over cooking areas with under-cabinet LED strips or adjustable clip-on lights. For ambiance, string lights overhead or install solar path lights nearby. Battery-operated puck lights can be added to storage areas for convenience after dark.
Weather Protection
Consider adding a simple pergola, canopy, or large patio umbrella to protect your outdoor kitchen from sun and light rain. For grill covers and cabinet doors, choose water-resistant materials with proper ventilation to prevent moisture buildup.
Cooking Accessories
Mount a paper towel holder, install hooks for grilling tools, and add a small herb garden in nearby containers for fresh flavors. A magnetic knife strip or utensil holder keeps essential tools within reach while cooking.
Seating and Comfort
Position weather-resistant seating nearby to create a complete entertainment zone. Consider built-in benches, outdoor dining sets, or bar stools depending on your kitchen design. Add outdoor cushions and pillows in weather-resistant fabrics for comfort and color.
Personal Touches
Incorporate decorative elements that reflect your style—outdoor-rated artwork, decorative tiles, or custom signage. Potted plants and flowers add life and color while defining the space. Consider a small outdoor-rated bluetooth speaker for music while cooking.
Complete Your Outdoor Kitchen
Browse our collection of outdoor kitchen accessories to add the perfect finishing touches to your weekend project.
Shop AccessoriesMaintaining Your DIY Outdoor Kitchen

To ensure your weekend project provides years of enjoyment, implement these simple maintenance practices throughout the outdoor cooking season:
Regular Cleaning
Wipe down countertops after each use with appropriate cleaners for your surface material. For wood components, check for water damage or warping seasonally and reseal as needed. Clean grill grates according to manufacturer recommendations after each use.
Seasonal Care
Before winter, thoroughly clean all surfaces and apply protective covers to grills and countertops if your kitchen will be exposed to harsh weather. For wooden structures, apply a fresh coat of exterior sealer annually to prevent weather damage.
Safety Checks
Regularly inspect gas connections for leaks using soapy water (bubbles indicate a leak). Check electrical components for damage from weather or pests. Ensure all heat shields remain properly positioned between heat sources and combustible materials.
Structural Maintenance
For block structures, check mortar joints annually and repair any cracks. For wooden frames, inspect for rot, insect damage, or loose fasteners each spring. Tighten any loose hardware and replace damaged components promptly.
Quick Tip: Create a simple maintenance checklist and keep it with your grilling tools. A quick monthly inspection can prevent small issues from becoming major problems.
Ready to Build Your Weekend Outdoor Kitchen?

With these five weekend-friendly DIY outdoor kitchen ideas, you're well-equipped to transform your backyard into a functional cooking and entertaining space without breaking the bank or requiring professional contractors. Whether you choose the mobility of a rolling cart, the durability of concrete blocks, or the rustic charm of repurposed pallets, you can create a custom outdoor kitchen that fits your space, style, and cooking needs.
Remember that the perfect outdoor kitchen doesn't have to be elaborate or expensive—it just needs to work for your lifestyle and enhance your outdoor living experience. Start with one of these weekend projects, and you can always expand or upgrade in the future as your needs change or your DIY skills grow.
So gather your materials, set aside a weekend, and get building! By Monday morning, you could be enjoying coffee at your very own outdoor kitchen counter, planning your first backyard cookout with pride in what you've accomplished.
Start Your Outdoor Kitchen This Weekend
Ready to transform your backyard? Get all the materials you need delivered and start building your dream outdoor kitchen.
Shop All Outdoor Kitchen SuppliesFrequently Asked Questions
Do I need a permit to build a DIY outdoor kitchen?
Permit requirements vary by location. Generally, simple non-permanent structures like rolling carts or freestanding islands often don't require permits. However, if you're running gas lines, electrical wiring, or plumbing, you'll likely need permits and professional installation. Check with your local building department and HOA before starting your project.
What's the most weather-resistant material for an outdoor kitchen?
Concrete block and stone structures offer the best weather resistance for outdoor kitchens. For countertops, granite, concrete, and outdoor-rated tile hold up well to the elements. If using wood, always choose pressure-treated lumber and apply quality exterior sealant annually to extend its lifespan.
Can I build an outdoor kitchen on my existing deck?
Yes, but with important considerations. First, verify your deck can support the additional weight—especially for masonry structures. Always use non-combustible materials beneath and around cooking areas. For wooden decks, lighter-weight options like the rolling cart kitchen are often more suitable than heavy block structures.
What's the minimum size needed for a functional outdoor kitchen?
A functional outdoor kitchen can be built in as little as 6 linear feet of space. At minimum, you need room for your grill (typically 30-36 inches) plus at least 18-24 inches of counter space for food prep. For more comfortable cooking, aim for 8-10 feet total if space allows.
How much should I budget for a weekend DIY outdoor kitchen?
Budget-friendly options like the pallet grill station can be built for $200-400 plus the cost of your grill. Mid-range projects like the concrete block kitchen typically run $500-800. More elaborate designs with quality countertops and built-in appliances might reach $1,000-1,500. This represents significant savings compared to professional installations, which often start at $5,000-10,000.