How to get perfectly cooked chicken that’s delicious and full of flavor every single time:
Grilling chicken can feel tricky, but it doesn't have to be. Many of us end up with dry, tough meat simply because we overlook a few crucial steps.

The secret to juicy grilled chicken lies in proper preparation, the right cooking temperature, and knowing when your chicken is perfectly done. With the right methods, you can create tender, flavorful chicken that your family will love every time.
Let me walk you through what I've learned about mastering grilled chicken. You'll learn how to pick the best cuts, season them for real flavor, and use your grill like a pro.
Key Takeaways
- Please choose the right chicken cuts and prepare them properly before grilling for best results
- Control your grill temperature and use proper cooking techniques to keep chicken moist
- Store and reheat leftover grilled chicken correctly to maintain its juicy texture
How to Grill Juicy Chicken Every Time
The secret to juicy grilled chicken comes down to three things: locking in moisture, hitting the right internal temp, and dodging a few classic mistakes. If you get those right, dry chicken becomes a thing of the past.
Core Techniques for Retaining Moisture
I always start with a brine or marinade at least 2 hours before grilling. Salt draws out moisture first, then pulls it back in with extra flavor.
Quick Brine Recipe:
- 4 cups water
- 1/4 cup salt
- 2 tablespoons sugar
For marinades, I stick with acidic ingredients like lemon juice or vinegar, but only for 2-4 hours. Any longer and the meat starts to get weirdly soft.
Before grilling, I pat the chicken completely dry. If it's wet, it steams instead of searing, and you end up with rubbery skin—no thanks.
Two-zone grilling is my go-to for thick pieces. I sear over high heat for a couple of minutes per side, then move the chicken to medium heat to finish up.
I never press down on chicken with a spatula. That just squeezes out all the juices I worked so hard to keep in there.
Best Internal Temperature for Chicken
My thermometer needs to say 165°F for all chicken parts. I check the thickest spot, away from the bone.
When I grill whole chickens, I test the thigh meat near the hip joint. Thighs take longer than breasts, so I always check there.
I pull chicken off the grill at 160°F because it continues to rise a few degrees as it rests. This way, I don't overcook it.
Temperature Guide:
- Chicken breasts: 160°F (pull off grill)
- Thighs and drumsticks: 165°F
- Whole chicken: 165°F in thigh
I let chicken rest for 5-10 minutes after grilling—no exceptions. This gives the juices time to settle back into the meat. If I cut too soon, all that goodness just spills out onto the cutting board.
Common Mistakes that Lead to Dry Chicken
I've seen people cook chicken on high heat the whole time. That burns the outside while the inside stays raw.
Starting with ice-cold chicken from the fridge? Not a great idea. I let it sit at room temperature for about 30 minutes before grilling.
Flipping too often dries out the meat. I only flip once during cooking. Every flip releases moisture and heat.
Mistakes to Avoid:
- Skipping the brine or marinade
- Not using a meat thermometer
- Cooking over high heat only
- Cutting into chicken too soon
I never trust cooking times alone. Grill temp, chicken thickness, even the weather—everything changes how fast it cooks. My thermometer never lies to me.
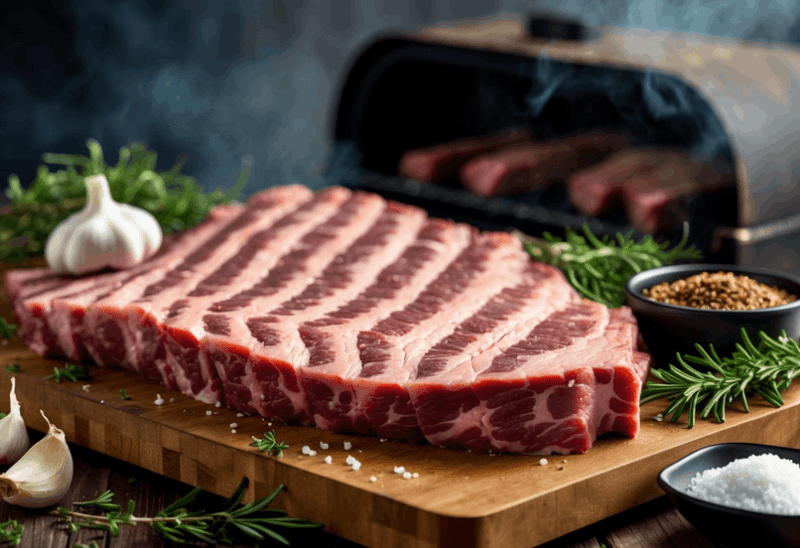
Choosing and Preparing Chicken for Grilling

Picking the right chicken cuts and prepping them properly makes the biggest difference in grilling success. I like to choose cuts that cook evenly, trim off extra fat, and use marinades or brines for flavor and moisture.
Selecting the Right Chicken Cuts
For beginners, I always suggest bone-in, skin-on chicken thighs. They're forgiving and stay juicy even if you mess up a little.
Chicken breasts are fine, but they dry out faster. I try to pick breasts that are close in size so they cook at the same rate.
Best cuts for grilling:
- Thighs (bone-in or boneless)
- Drumsticks
- Whole chicken (spatchcocked)
- Chicken breasts (uniform thickness)
I usually skip wings for main dishes since they cook too fast. Whole chickens are great once you cut them up or flatten them out.
I look for chicken with firm, pink flesh. If it looks gray or smells funky, I pass.
Trimming and Flattening for Even Grilling
Before grilling, I trim off any extra fat and skin. That helps prevent flare-ups and makes the seasoning stick better.
For chicken breasts, I pound them out to about 3/4 inch thick. I use a meat mallet and some plastic wrap—nothing fancy.
My trimming checklist:
- Remove loose skin flaps
- Cut away visible fat pockets
- Trim any cartilage or bone fragments
I make shallow cuts in thick parts of thighs to help them cook evenly. It's called scoring, and it's worth the extra minute.
For whole chickens, I cut out the backbone with kitchen shears and flatten the bird by pressing down on the breastbone.
Using Brines and Marinades Effectively
I brine chicken for 2-4 hours before grilling. My basic brine is 1/4 cup salt per quart of water.
Brining adds moisture and flavor deep into the meat. I never leave chicken in brine for more than 8 hours or it starts to get mushy.
Simple brine recipe:
- 4 cups water
- 1/4 cup kosher salt
- 2 tablespoons sugar
- Optional: herbs, garlic, lemon
Marinades work differently than brines. If I'm using something acidic, like lemon juice or vinegar, I keep it to 30 minutes to 2 hours.
Oil-based marinades can go longer—up to 24 hours. I always marinate chicken in the fridge, never on the counter.
After brining or marinating, I pat the chicken dry before grilling. Wet chicken just can't get those nice grill marks.
Seasoning and Flavoring Strategies

I like dry rubs for crispy skin and deep flavor, while marinades add moisture and tenderness. The trick is letting the chicken soak up those flavors before it hits the grill.
Essential Dry Rubs and Seasoning Blends
I always start with salt as my base. It pulls moisture from the surface and helps with browning. I use about a teaspoon per pound of chicken.
My Basic Chicken Rub:
- 2 tablespoons brown sugar
- 1 tablespoon paprika
- 1 teaspoon garlic powder
- 1 teaspoon onion powder
- 1 teaspoon black pepper
- 1/2 teaspoon cayenne pepper
I mix these spices in a bowl before coating the chicken. Brown sugar gives a golden crust, and paprika adds color with a touch of heat.
For a Mediterranean vibe, I swap brown sugar for dried oregano and toss in lemon zest. Mexican-style rubs work with cumin, chili powder, and lime zest.
Dry rubs need at least 30 minutes on the chicken before grilling. That gives the salt time to do its thing and the spices time to stick.
Marinade Ingredients That Maximize Juiciness
Every marinade I make gets acid, oil, and salt. The acid breaks down tough fibers, and oil keeps things moist while cooking.
Effective Acid Options:
- Lemon juice (2-3 tablespoons per pound)
- Vinegar (apple cider or white wine)
- Yogurt (plain, Greek-style)
- Wine (white or red)
I add a couple of tablespoons of oil for every pound of chicken. Olive oil is my favorite, but vegetable oil is fine too.
My go-to marinade: 1/4 cup lemon juice, 2 tablespoons olive oil, 2 minced garlic cloves, and a teaspoon of salt. Herbs like thyme or rosemary are optional but awesome.
I never marinate chicken for more than 8 hours. Too much acid and the meat gets mushy—nobody wants that.
Resting Chicken for Better Flavor Absorption
I let seasoned chicken rest in the fridge before grilling. This step does make a difference in flavor.
For dry rubs, I rest chicken for 30 minutes to 2 hours. The salt draws out moisture, then the meat soaks it back up with the spices.
Marinades need 2 to 8 hours for best results. I go shorter for chicken breasts and longer for thighs or drumsticks.
Before grilling, I bring the chicken to room temp for 15-20 minutes. Cold chicken cooks unevenly and tends to dry out on the outside before it's done inside.
I pat the chicken dry with paper towels after resting. This helps get a good sear and those tasty grill marks.
Mastering Grilling Methods and Equipment
Let's talk about picking the right heat, choosing the best grill type, and managing temperature for perfect chicken. These three things? They'll make a real difference in your grilling.
Direct vs. Indirect Heat Techniques
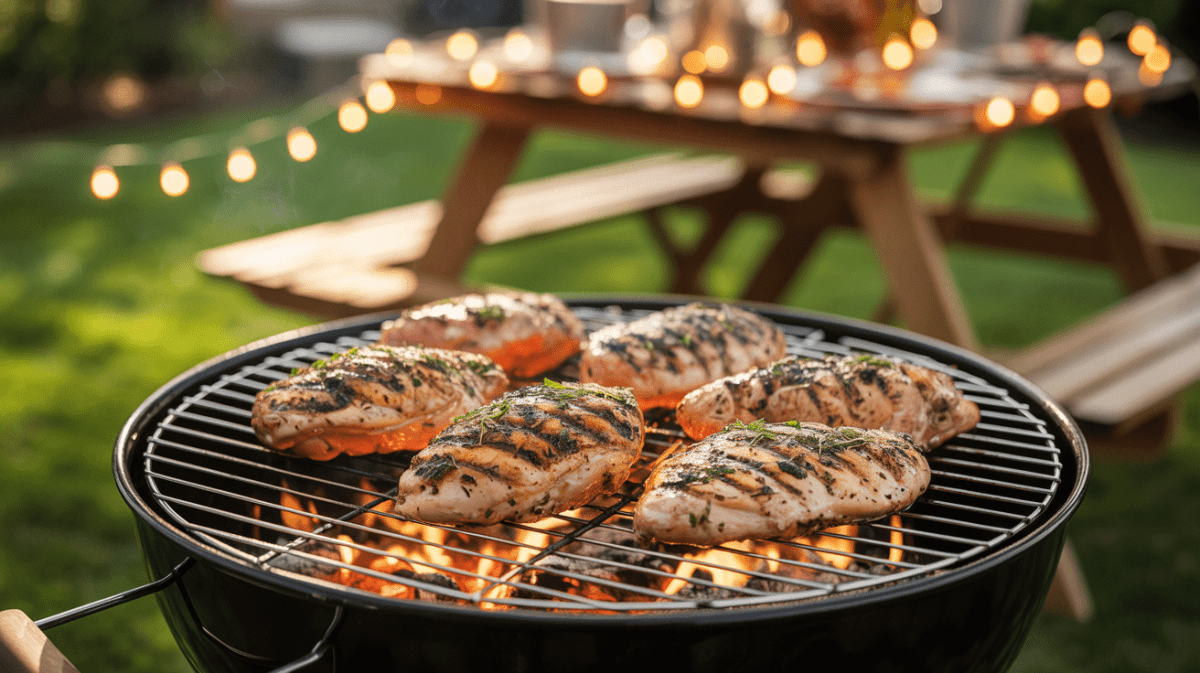
Direct heat means putting the chicken right over the flames or coals. I use this for thin cuts like breasts, thighs, or wings.
The high heat sears the outside and cooks the meat in 10-15 minutes. I go with direct heat when I want crispy skin and those grill marks everyone loves.
Set the chicken about 4-6 inches above the heat. I turn the pieces every 4-5 minutes to prevent them from burning.
Indirect heat is when I cook chicken away from the flames. One side of the grill stays hot, the other cool.
This works for whole chickens or thick pieces. Lower heat cooks the meat through without burning the outside, and it usually takes 25-45 minutes depending on size.
I start thick pieces over direct heat for just a couple of minutes per side. Then I move them to indirect heat to finish—crispy skin, juicy inside.
Grill Types: Gas, Charcoal, and Electric
Gas grills heat up in 10-15 minutes. I like the steady temperature control, turn the knobs for easy heat zones.
They're great for beginners who want reliable results. I can also turn off burners on one side for indirect heat.
Gas grills cost a little more upfront, but they don't guzzle fuel. Charcoal grills get hotter and bring that smoky flavor I crave.
They take 20-30 minutes to heat up. I pile coals on one side for direct heat and leave the other side empty for indirect.
Charcoal needs more babysitting—add more coals every 45-60 minutes if you're cooking for a while. Electric grills plug in and work for apartments or condos.
They heat evenly but don't get as hot as gas or charcoal. Most max out at 400-450°F.
I use electric grills for quick chicken pieces, but I skip them for whole chickens since they can't hit high temps.
Managing Grill Temperature
I like a two-zone setup for chicken. High heat runs 450-500°F for searing, and medium heat hangs around 325-375°F for cooking through.
Temperature control methods:
- Gas grills: Turn the knobs up or down
- Charcoal grills: Open vents for more heat, close them to cool things down
- All grills: Move cooking grates up or down to change distance from the heat
I trust a grill thermometer at the grate level. Built-in thermometers? They usually read 50-75°F too high.
I keep the lid closed to hold heat in. Every time I open the lid, the temperature drops 25-50°F, which is kind of annoying.
Wind can mess with your temps, too. I tuck my grill out of the wind or throw up a windscreen if it's really gusty.
Serving, Storing, and Reheating Juicy Grilled Chicken
When your chicken comes off the grill, what you do next really matters. Let's talk about cutting, storing, and reheating so every bite stays juicy.
Carving Chicken for Maximum Juiciness
I let my grilled chicken rest for 5-10 minutes before I even think about cutting it. If you skip this, all the juices end up on the cutting board instead of in the meat.
When I carve breasts, I cut against the grain. I look for the lines and slice across them at a bit of an angle—makes it way more tender.
For whole chickens, I take off the legs and thighs first. I cut through the skin between the leg and body, then pop the joint out.
The breast comes off in two pieces if you cut along the breastbone. You don't need to be a pro chef just go slow.
My carving tips:
- Use a sharp knife, always
- Cut pieces about ½ inch thick
- Keep the cuts clean—don't saw back and forth
- Save those juices on the board!
I pour the juices over the chicken right before serving. It sounds simple, but it makes a big difference in flavor and moisture.
Safe Storage and Refrigeration Tips
I get leftover chicken in the fridge within 2 hours of cooking. If it's over 90°F outside, I don't wait longer than an hour.
Shallow containers help chicken cool fast. Deep containers keep the center warm too long, and that's just asking for bacteria.
Storage times I stick to:
- Fridge: 3-4 days
- Freezer: 2-6 months
- Room temp: Max 2 hours
I wrap chicken tight in plastic or use sealed containers. Keeps it from drying out and blocks weird fridge smells.
For freezing, I use freezer paper or bags and always write the date. Nothing worse than mystery meat in the back of the freezer.
Best Ways to Reheat Without Drying Out
I avoid the microwave—it just makes grilled chicken tough and dry. My go-to is the oven.
Heat to 325°F, put the chicken in a covered dish with a splash of broth or water, and 15-20 minutes later it's hot and still juicy.
Other solid reheating methods:
- Stovetop: Medium-low in a covered pan with a little liquid
- Grill: Wrapped in foil with butter or oil, 5-8 minutes
- Air fryer: 350°F for 3-4 minutes—just keep an eye on it
I check that reheated chicken hits 165°F inside. A meat thermometer is your best friend here.
Adding a splash of liquid while reheating keeps things moist. Chicken broth, melted butter, or even water all work.
Frequently Asked Questions
Getting perfect grilled chicken is all about temperature control, timing, and good technique. Most people worry about dry meat or food safety, and honestly, I get it.
What are the key factors in determining grilling temperature for chicken?
I stick with medium heat, around 350-375°F, for most pieces. That way, the meat cooks through without burning the outside.
For thick breasts, I start with medium-high heat to sear, then switch to medium or indirect heat to finish.
Bone-in pieces need a lower temp than boneless. I use 325-350°F for thighs and drumsticks since they take longer.
How long should chicken be marinated before grilling to enhance its juiciness?
I marinate chicken for at least 30 minutes to add flavor and moisture. The oils and acids in a marinade really help keep it juicy.
My sweet spot is 2-4 hours before grilling. That's enough time for flavor without turning the texture weird.
Don't go over 24 hours—acidic marinades can make the meat mushy if you wait too long.
What techniques ensure even cooking when grilling chicken?
I pound thick chicken breasts to an even thickness before grilling. That way, everything cooks at the same pace.
A two-zone setup works great for bigger pieces. I sear first, then move them to indirect heat.
I only flip chicken once. If you move it around too much, you end up with dry spots and uneven cooking.
Is there a preferred type of grill or grilling method for achieving optimal chicken juiciness?
Gas grills give me better temperature control, so it's easier to avoid overcooking. Adjusting heat zones is a breeze.
Charcoal grills bring awesome flavor but need more attention. I use a chimney starter for even heat.
For whole chickens or thick pieces, indirect grilling wins. I put coals on one side and cook chicken on the cooler side.
What are the signs that chicken is fully cooked and safe to eat, yet still juicy?
I always check with a meat thermometer—165°F in the thickest part means it's done.
Juices should run clear when you pierce the meat. If they're pink or red, keep grilling.
Properly cooked chicken feels firm but not rock hard. If it feels super firm and looks dry, it's probably overcooked.
How can resting time after grilling affect the juiciness of chicken?
I usually let grilled chicken rest for about 5 to 10 minutes after cooking. That way, the juices have a chance to move back through the meat instead of escaping the second I slice in.
If I cut too early, those juices just spill out onto the cutting board—nobody wants that. Resting really does help keep the moisture inside.
I’ll often tent the chicken loosely with foil as it rests. It stays warm, and I like to think the juices get cozy and settle back into the meat fibers during this time.
DISCLAIMER
This document is provided for general information purposes only and should not be relied upon as providing legal advice, technical, or specific operational guidance to the reader, whether as to the practices described in the document or the applicable legal requirements and regulations. backyardgrillingpros.com expressly disclaims any responsibility for liability arising from or related to the use or misuse of any information in this document.