How to Rotisserie Grill Game Hens: Expert Guide for Juicy Results
Rotisserie grilling turns Cornish game hens into perfectly cooked birds with crispy, golden skin. The spinning rotisserie keeps the meat juicy and tender without much fuss.

Brine Cornish game hens for 2-4 hours, season them well, secure to the spit, and grill at high heat for 30-45 minutes. Aim for a breast temperature of 160-165°F and thigh at 170-180°F for the best results. It’s honestly easier than it looks, and you’ll end up with food that feels straight out of a restaurant.
Rotisserie cooking game hens is a mostly hands-off way to wow your guests at dinner. Whether you’re using a basic attachment or something fancier, you can nail this technique with a little prep and timing.
Key Takeaways
- Brining for 2-4 hours keeps Cornish hens moist and flavorful
- Cook at high heat for 30-45 minutes, checking the temperature every 10 minutes
- Let the hens rest for 15 minutes before cutting them in half to serve
Understanding Cornish Game Hens
Cornish game hens are small chickens, usually 1 to 2 pounds each. Their size makes them perfect for single servings on a rotisserie grill.
These birds have some quirks that affect how they cook. They’re great for rotisserie because of their tenderness and quick-cooking nature.
What Are Cornish Hens and Cornish Game Hens
Cornish hens and Cornish game hens are actually the same thing—just different names. They’re a chicken breed raised for their tender meat and small stature.
Despite “game” in the name, these aren’t wild birds. Farmers cross Cornish chickens with other breeds to get a fast-growing, small chicken.
Each hen usually weighs 1 to 2 pounds at the store. That’s much smaller than a typical chicken, which can be 3 to 5 pounds or more.
Serving a whole bird per person looks impressive. Since the birds are processed young, the meat stays tender and mild—easy to pair with all kinds of seasonings.
Ideal Size and Selection for Rotisserie
When you shop, grab Cornish hens in the 1 to 2 pound range. This size cooks evenly and stays juicy on the rotisserie.
Pick birds with plump breasts and smooth, moist skin. Avoid any that smell off. Skin color varies from pale yellow to white, depending on what they ate.
Hens under 1.5 pounds are quick and easy to handle. Larger hens over 2 pounds take longer, and you might need to space them out more on the spit.
Fresh is best, but frozen works fine if you thaw them right. Give frozen hens a full 24 hours in the fridge to thaw before you start cooking.
Unique Cooking Characteristics
Cornish game hens cook faster than regular chickens thanks to their size. Plan for about 15 minutes per pound on the rotisserie.
As they spin, the birds baste themselves in their own juices. That’s why the skin gets so evenly crisp and golden.
Small birds heat through more evenly, so you’re less likely to overcook the breast or undercook the thigh. Make sure the thickest part of the thigh hits 165°F.
Their compact shape means the skin crisps up fast. Keep an eye on the temperature—medium heat around 350°F is usually the sweet spot for rotisserie Cornish hens.
Essential Equipment and Tools
You’ll need some specific gear to get great rotisserie game hens. The right grill setup, a good thermometer, and trussing tools make a big difference.
Choosing a Rotisserie Grill
Get a grill with a rotisserie attachment. Gas grills are easy to control, but charcoal grills add a smoky flavor if you’re up for managing the heat.
Look for at least 400 square inches of cooking space. That gives the spit room to spin without the birds bumping into anything.
Some grills come with rotisserie kits, but sometimes you’ll need to buy the attachment separately. Double-check it fits your grill before you buy.
Rotisserie Spit and Motor Basics
The spit is a metal rod—usually stainless steel, 30 to 40 inches long—that runs through the birds. Forks on each end lock the hens in place.
Your rotisserie motor spins the spit. Electric motors are more reliable than battery-powered ones, and you won’t have to worry about them dying mid-cook.
Set the motor on the left side of most grills. It should spin at 3 to 6 RPM for game hens—faster can cook unevenly, and slower doesn’t get enough airflow.
Give the motor a test run before cooking, just to make sure it can handle the weight of your birds.
Using an Instant Read Thermometer
An instant read thermometer is key for checking doneness. You want 165°F in the breast and 175°F in the thigh.
Stick the thermometer into the thickest part of the thigh, avoiding bone. Bones can throw off the reading.
Check a few spots on each hen to make sure everything’s cooked through. Digital thermometers are fast and accurate—dial ones are slower and not as precise.
It’s smart to calibrate your thermometer before each cook. Stick it in ice water; it should read 32°F.
Required Accessories for Trussing and Safety
Butcher’s twine helps keep the hens compact on the spit. Tie the legs and wings tight to prevent burning and to keep the birds spinning evenly.
Grab heat-resistant gloves—silicone ones rated for 450°F or higher are great. They’re not too bulky and protect your hands from the hot spit.
Place a drip pan under the birds to catch fat and avoid flare-ups. A 9x13 inch foil pan works for most grills, or use an enameled roasting pan that fits your setup.
The pan will also catch juices you can use for basting if you want.
Preparing Game Hens for the Rotisserie

Prepping your hens matters for even cooking and crispy skin. Cleaning removes moisture that can mess with browning, and trussing keeps everything secure on the spit.
Cleaning and Drying the Hens
Take the hens out of their packaging and pull out any giblets or necks from inside. Give each bird a quick rinse under cold water, but don’t linger.
Pat the hens completely dry, inside and out, with paper towels. Focus on the cavity and under the wings—water hides there.
For really crispy skin, set the dried hens on a wire rack over a baking sheet. Leave them uncovered in the fridge for at least 4 hours, or up to a day. This dry brining step helps dehydrate the surface for better browning.
Spatchcocking and Trussing Techniques
You’ve got two ways to secure hens on a spit, but most folks skip spatchcocking and just truss the whole bird. Whole hens look more dramatic, and the rotisserie does a good job of even cooking anyway.
To truss, tuck the wing tips behind the back. Cross the legs, tie them up with butcher’s twine, and pull everything snug to the body.
This keeps the limbs from flopping around and helps the spit spin smoothly. Thread the trussed hens onto the rotisserie spit, centering them for balance.
Secure with the spit forks and give it a spin by hand to check the balance before you fire up the grill.
Brining, Seasoning, and Flavor Techniques

How you prep the birds makes all the difference. Brining adds moisture and flavor, while herb rubs and aromatics give the skin that crave-worthy taste and aroma.
Brining for Moisture and Flavor
Brining your game hens gives you a little wiggle room during cooking. The saltwater helps the meat soak up extra moisture, so the breast meat doesn’t dry out if you go a bit past 165°F.
Mix ½ cup table salt and ¼ cup sugar into 2 quarts of water for a basic brine. Drop your hens in, make sure they’re fully submerged, and stick them in the fridge for 2-4 hours. Don’t let them sit longer than 4 hours or they’ll get too salty.
After brining, pat the hens dry with paper towels. Wet skin just won’t brown right on the rotisserie. The sugar in the brine adds a touch of sweetness that balances out the savory notes.
Herb Rubs and Marinades
An herb rub brings a lot of flavor to rotisserie cornish hens. Mix fresh minced herbs with olive oil, garlic, and black pepper to make a paste. Try thyme, oregano, rosemary, or sage—whatever you like best.
Gently loosen the skin over the breast by sliding your finger underneath. Rub some of that herb mix right onto the breast meat under the skin. That’s where you want the flavor to really shine.
Spread the rest of the rub over the outside and inside the cavity. Let the seasoned hens hang out at room temp for 15-20 minutes while you prep your grill. No shame in using a store-bought poultry seasoning if you’re in a hurry.
Stuffing and Aromatics
Toss aromatics inside the cavity for a subtle boost of flavor. Lemon quarters, garlic cloves, and fresh herb sprigs work great. As the hens cook, these release a gentle steam and aroma.
Don’t overstuff—just a couple lemon pieces and a few herb sprigs do the trick. If you cram too much in, heat can’t circulate well inside the bird.
Try adding lemon zest to your herb rub for a pop of citrus without extra moisture. The zest gives a bright flavor and keeps the skin ready for browning.
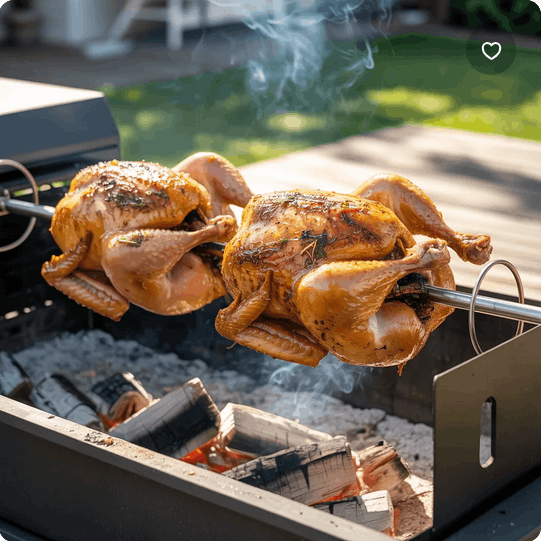
Step-by-Step Rotisserie Grilling Process
Game hens do best between 350°F and 400°F, usually taking 60 to 75 minutes to hit a safe internal temperature of 165°F. With the right setup and a little attention, you’ll get crispy skin and juicy meat.
Setting Up and Balancing the Rotisserie
Mount your rotisserie motor to the grill. Take out the cooking grates and set a drip pan under where the hens will spin.
Thread the spit rod through each hen from tail to neck. Leave 2 to 3 inches between birds if you’re cooking more than one. Secure each bird with the spit forks, making sure the prongs dig in on both sides.
Check the balance before firing up the grill. Hold the loaded spit by the ends and rotate it in your hands. The hens should turn smoothly, not wobble or tilt. If they’re off-balance, adjust their position to save your motor from strain.
Preheat the grill with all burners on high for 10-15 minutes. Then, turn off the center burner under the spit for indirect heat. Keep the outer burners on to hold your target temperature.
Cooking Times and Temperature Targets
Keep your grill between 350°F and 400°F. Most hens weigh 1.5 to 2 pounds and need about 60 to 75 minutes on the rotisserie.
Once the grill’s hot, turn on the motor and close the lid. The hens will baste themselves as they spin. That’s a nice bonus.
Target these internal temps:
- Breast meat: 165°F minimum
- Thigh meat: 170°F to 175°F for the best bite
- Skin surface: Aim for 400°F for crispiness
If you’re using charcoal, check every 45 minutes. Add 8 to 10 briquettes per side to keep the heat up.
Monitoring Doneness and Crispy Skin Tips
About 15 to 20 minutes before you think they’ll be done, stop the motor. Stick an instant read thermometer into the thickest part of the thigh, but don’t hit bone.
The skin crisps up from all that rotating heat. If it still looks pale once the inside hits 165°F, crank the outer burners to 425°F for the last 10 minutes.
How do you know they’re ready?
- Golden, crispy skin all over
- Clear juices when you poke them
- Legs wiggle easily at the joint
- Internal temp is steady at 165°F
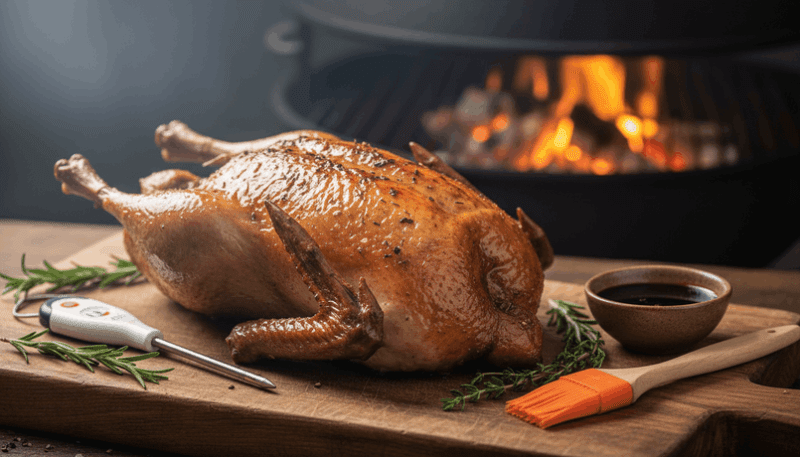
Let the hens rest on the spit for 10 minutes after you pull them off. This gives the juices time to settle back in. Use heat-resistant gloves when you take out the spit and forks—it’s hotter than it looks.
Serving, Carving, and Storing Rotisserie Hens
Once your rotisserie cornish hens are cooked, how you handle them makes a big difference. Resting, carving, and storing them right keeps everything juicy and tasty.
Resting and Carving for Best Results
Take the hens off the grill and let them rest for 10 minutes before you cut in. That way, the juices have time to move back into the meat instead of just running out onto your board.
Grab a sharp knife and slice down along the breastbone. Cut along both sides to free the breast meat from the ribs. For drumsticks, cut through the joint where the thigh meets the body. Wings come off at their joints.
If you want a fancier look, you can debone the hens completely and slice the meat into neat pieces. Go slow with the knife to keep everything together and juicy.
Serving Suggestions and Side Ideas
Classic BBQ Sides are always a hit with rotisserie cornish hens:
- Coleslaw
- Corn on the cob
- Baked beans
- Potato salad
Roasted veggies, wild rice, or a fresh salad also work really well. Try a citrus dressing or some herb sauce for extra brightness.
Top your hens with fresh herbs or a wedge of lemon. Usually, one hen feeds one person, but you can stretch it to two if you serve plenty of sides. Serve the meat hot, right after carving, for the best results.
Storage and Reheating Tips
Put any leftover rotisserie cornish hens in an airtight container in the fridge. The meat stays good for 3-4 days if you keep it cold.
Reheating options:
- Oven: 350°F for 15-20 minutes
- Microwave: Medium power, 30-second bursts
- Stovetop: Slice the meat and warm it in a covered pan with a splash of broth
The oven keeps the skin crispier than other methods. Cover the meat loosely with foil so it doesn’t dry out. Add a splash of water or broth before reheating if you want to keep things moist.
Frequently Asked Questions
Most questions about rotisserie game hens are about temperature (350-375°F) and cooking time (50-70 minutes), but prepping and balancing the birds is just as important.
What is the ideal temperature setting for rotisserie grilling Cornish hens on a gas grill?
Set your rotisserie burner to medium heat, aiming for 350-375°F inside the grill. That’s hot enough to crisp the skin while the meat cooks evenly.
Some grills work best at a steady 350°F the whole time. If yours runs hot, turn it down a bit so you don’t burn the skin before the inside is done.
How long should Cornish hens be cooked on a rotisserie for optimal doneness?
Most game hens need 50-70 minutes on the rotisserie at 350-375°F. The exact time depends on the size and how steady your grill’s heat is.
Always use an instant-read thermometer to check doneness. The thickest part of the thigh should read 165°F, and don’t let the probe touch bone.
Don’t trust just the clock—grill hot spots and bird sizes vary. The thermometer’s your best friend for food safety.
Can you share a top-rated recipe for preparing Cornish hens using a rotisserie method?
A solid rotisserie game hen recipe starts with a dry brine 4-24 hours before cooking. Pat the hens dry and season them inside and out with about 3/4 teaspoon kosher salt per bird.
For the herb butter, mix 4 tablespoons softened unsalted butter, 2 minced garlic cloves, 1 tablespoon fresh thyme, 1 teaspoon fresh rosemary, and zest from half a lemon. Slide that under the skin before you cook.
Truss the hens tightly with butcher’s twine to keep everything tucked in. That stops uneven cooking and keeps the birds spinning smoothly.
What are the best practices for achieving evenly cooked Cornish hens on a rotisserie?
Balance the spit so it turns smoothly. If one side’s heavier, the motor struggles and you get uneven cooking.
Truss the hens with the wings tucked and legs tied. Loose parts flop around and can burn or cook too slowly.
Pat the birds dry before seasoning. Too much moisture keeps the skin from crisping and messes with even heat.
Is it possible to cook multiple Cornish hens on a rotisserie at the same time, and how does this affect cooking time?
You can fit two game hens on a spit if your grill’s big enough. Cooking time stays about the same—50-70 minutes—since the heat hits both birds as they rotate.
Try to use hens that are close in size for even cooking. Big differences make balancing tricky.
Center and secure each hen with spit forks so they spin evenly. Give the spit a test spin before you start to make sure the motor can handle the load.
How can Cornish hens be prepared in an air fryer using a rotisserie setting, and what are the time and temperature guidelines?
If your air fryer comes with a rotisserie function, you’ll want to prep the hens just like you would for grilling outside. Go ahead and dry brine them first, then work some herb butter under the skin—trust me, it makes a difference.
Set the air fryer to 350°F. Let the hens cook for about 40 to 50 minutes.
Air fryers usually cook a bit faster than outdoor rotisseries, so I’d start checking the internal temperature at the 40-minute mark. It’s easy to overdo it if you’re not paying attention.
Make sure your hens actually fit on the rotisserie spit inside your air fryer. Most regular-sized air fryers can only fit one hen at a time, and squeezing in two just messes with the airflow.
DISCLAIMER
This document is provided for general information purposes only and should not be relied upon as providing legal advice, technical, or specific operational guidance to the reader, whether as to the practices described in the document or the applicable legal requirements and regulations. outdoorgrillguide.com expressly disclaims any responsibility for liability arising from or related to the use or misuse of any information in this document.